MCP协议
MCP协议
MCP 是一个标准化协议,旨在通过提供结构化的上下文管理来增强大型语言模型(LLMs)与应用程序之间的交互。
介绍
MCP (Model Context Protocol) 是一个开放协议,用于标准化应用程序如何向 LLM 提供上下文。可以将 MCP 想象成 AI 应用程序的 USB-C 接口。就像 USB-C 为设备连接各种外设和配件提供标准化方式一样,MCP 为 AI 模型连接不同的数据源和工具提供了标准化的方式。
为什么选择 MCP?
MCP 帮助您在 LLM 之上构建代理和复杂工作流。LLM 经常需要与数据和工具集成,而 MCP 提供:
- 预构建集成列表,您的 LLM 可以直接接入
- 在不同 LLM 提供商和供应商之间切换的灵活性
- 在您的基础设施中保护数据的最佳实践
从本质上讲,MCP 遵循客户端-服务器架构,其中主机应用程序可以连接到多个服务器:

- MCP 主机: 像 Claude Desktop、IDE 或 AI 工具等想要通过 MCP 访问数据的程序
- MCP 客户端: 与服务器保持 1:1 连接的协议客户端
- MCP 服务器: 通过标准化的模型上下文协议暴露特定功能的轻量级程序
- 本地数据源: MCP 服务器可以安全访问的计算机文件、数据库和服务
- 远程服务: MCP 服务器可以连接的通过互联网提供的外部系统(例如通过 API)
快速开始
mcp server 开发
在本教程中,我们将构建一个简单的MCP天气服务器并将其连接到宿主应用程序Claude桌面版。我们将从基本设置开始,然后逐步进行到更复杂的用例。
许多大语言模型(包括Claude)目前没有获取天气预报和严重天气警报的能力。让我们使用MCP来解决这个问题!
我们将构建一个服务器,提供两个工具:get-alerts和get-forecast。然后我们将服务器连接到MCP宿主应用程序(在本例中是Claude桌面版):
MCP服务器可以提供三种主要类型的功能:
- 资源:类似文件的数据,可以被客户端读取(如API响应或文件内容)
- 工具:可以被大语言模型调用的函数(需要用户批准)
- 提示:预先编写的模板,帮助用户完成特定任务
from typing import Any
import httpx
from mcp.server.fastmcp import FastMCP

# Initialize FastMCP server
mcp = FastMCP("weather")

# Constants
NWS_API_BASE = "https://api.weather.gov"
USER_AGENT = "weather-app/1.0"

async def make_nws_request(url: str) -> dict[str, Any] | None:
    """Make a request to the NWS API with proper error handling."""
    headers = {
        "User-Agent": USER_AGENT,
        "Accept": "application/geo+json"
    }
    async with httpx.AsyncClient() as client:
        try:
            response = await client.get(url, headers=headers, timeout=30.0)
            response.raise_for_status()
            return response.json()
        except Exception:
            return None

def format_alert(feature: dict) -> str:
    """Format an alert feature into a readable string."""
    props = feature["properties"]
    return f"""
Event: {props.get('event', 'Unknown')}
Area: {props.get('areaDesc', 'Unknown')}
Severity: {props.get('severity', 'Unknown')}
Description: {props.get('description', 'No description available')}
Instructions: {props.get('instruction', 'No specific instructions provided')}
"""

@mcp.tool()
async def get_alerts(state: str) -> str:
    """Get weather alerts for a US state.

    Args:
        state: Two-letter US state code (e.g. CA, NY)
    """
    url = f"{NWS_API_BASE}/alerts/active/area/{state}"
    data = await make_nws_request(url)

    if not data or "features" not in data:
        return "Unable to fetch alerts or no alerts found."

    if not data["features"]:
        return "No active alerts for this state."

    alerts = [format_alert(feature) for feature in data["features"]]
    return "\n---\n".join(alerts)

@mcp.tool()
async def get_forecast(latitude: float, longitude: float) -> str:
    """Get weather forecast for a location.

    Args:
        latitude: Latitude of the location
        longitude: Longitude of the location
    """
    # First get the forecast grid endpoint
    points_url = f"{NWS_API_BASE}/points/{latitude},{longitude}"
    points_data = await make_nws_request(points_url)

    if not points_data:
        return "Unable to fetch forecast data for this location."

    # Get the forecast URL from the points response
    forecast_url = points_data["properties"]["forecast"]
    forecast_data = await make_nws_request(forecast_url)

    if not forecast_data:
        return "Unable to fetch detailed forecast."

    # Format the periods into a readable forecast
    periods = forecast_data["properties"]["periods"]
    forecasts = []
    for period in periods[:5]:  # Only show next 5 periods
        forecast = f"""
{period['name']}:
Temperature: {period['temperature']}°{period['temperatureUnit']}
Wind: {period['windSpeed']} {period['windDirection']}
Forecast: {period['detailedForecast']}
"""
        forecasts.append(forecast)

    return "\n---\n".join(forecasts)

if __name__ == "__main__":
    # Initialize and run the server
    mcp.run(transport='stdio')
您的服务器已完成!运行uv run weather.py以确认一切正常工作。
使用Claude桌面版测试您的服务器
我们需要为您想要使用的任何MCP服务器配置Claude桌面版。为此,请在文本编辑器中打开您的Claude桌面版应用程序配置文件,位于~/Library/Application Support/Claude/claude_desktop_config.json。如果该文件不存在,请创建它。
然后您将在mcpServers键中添加您的服务器。只有在至少一个服务器正确配置的情况下,MCP UI元素才会在Claude桌面版中显示。
{
    "mcpServers": {
        "weather": {
            "command": "uv",
            "args": [
                "--directory",
                "ABSOLUTE_PATH_PLACEHOLDER",
                "run",
                "weather.py"
            ]
        }
    }
}
这告诉Claude桌面版:
- 有一个名为"weather"的MCP服务器
- 使用uv命令运行该服务器
- 在指定目录中运行服务器
- 使用weather.py作为入口点
现在,重启Claude桌面版。您应该会在工具栏中看到一个新的MCP图标。点击它,您将看到我们的天气工具!
问题处理流程:
- 客户端将问题发送给Claude
- Claude分析可用工具并选择使用
- 通过MCP服务器执行工具
- 返回结果给Claude
- Claude生成自然语言响应
- 向用户展示最终结果
mcp client 开发
在本教程中,你将学习如何构建一个连接到 MCP 服务器的 LLM 驱动的聊天机器人客户端。
import asyncio
from typing import Optional
from contextlib import AsyncExitStack

from mcp import ClientSession, StdioServerParameters
from mcp.client.stdio import stdio_client

from anthropic import Anthropic
from dotenv import load_dotenv

load_dotenv()  # 从 .env 加载环境变量

class MCPClient:
    def __init__(self):
        # 初始化会话和客户端对象
        self.session: Optional[ClientSession] = None
        self.exit_stack = AsyncExitStack()
        self.anthropic = Anthropic()

    # 服务器连接管理
    async def connect_to_server(self, server_script_path: str):
        """连接到 MCP 服务器

        参数:
            server_script_path: 服务器脚本路径 (.py 或 .js)
        """
        is_python = server_script_path.endswith('.py')
        is_js = server_script_path.endswith('.js')
        if not (is_python or is_js):
            raise ValueError("服务器脚本必须是 .py 或 .js 文件")

        command = "python" if is_python else "node"
        server_params = StdioServerParameters(
            command=command,
            args=[server_script_path],
            env=None
        )

        stdio_transport = await self.exit_stack.enter_async_context(stdio_client(server_params))
        self.stdio, self.write = stdio_transport
        self.session = await self.exit_stack.enter_async_context(ClientSession(self.stdio, self.write))

        await self.session.initialize()

        # 列出可用工具
        response = await self.session.list_tools()
        tools = response.tools
        print("\n已连接到服务器,可用工具:", [tool.name for tool in tools])

    # 现在添加处理查询和工具调用的核心功能
    async def process_query(self, query: str) -> str:
        """使用 Claude 和可用工具处理查询"""
        messages = [
            {
                "role": "user",
                "content": query
            }
        ]

        response = await self.session.list_tools()
        available_tools = [{
            "name": tool.name,
            "description": tool.description,
            "input_schema": tool.inputSchema
        } for tool in response.tools]

        # 初始 Claude API 调用
        response = self.anthropic.messages.create(
            model="claude-3-5-sonnet-20241022",
            max_tokens=1000,
            messages=messages,
            tools=available_tools
        )

        # 处理响应和工具调用
        tool_results = []
        final_text = []

        assistant_message_content = []
        for content in response.content:
            if content.type == 'text':
                final_text.append(content.text)
                assistant_message_content.append(content)
            elif content.type == 'tool_use':
                tool_name = content.name
                tool_args = content.input

                # 执行工具调用
                result = await self.session.call_tool(tool_name, tool_args)
                tool_results.append({"call": tool_name, "result": result})
                final_text.append(f"[调用工具 {tool_name},参数 {tool_args}]")

                assistant_message_content.append(content)
                messages.append({
                    "role": "assistant",
                    "content": assistant_message_content
                })
                messages.append({
                    "role": "user",
                    "content": [
                        {
                            "type": "tool_result",
                            "tool_use_id": content.id,
                            "content": result.content
                        }
                    ]
                })

                # 获取 Claude 的下一个响应
                response = self.anthropic.messages.create(
                    model="claude-3-5-sonnet-20241022",
                    max_tokens=1000,
                    messages=messages,
                    tools=available_tools
                )

                final_text.append(response.content[0].text)

        return "\n".join(final_text)

    async def chat_loop(self):
        """运行交互式聊天循环"""
        print("\nMCP 客户端已启动!")
        print("输入你的查询或 'quit' 退出。")

        while True:
            try:
                query = input("\n查询: ").strip()

                if query.lower() == 'quit':
                    break

                response = await self.process_query(query)
                print("\n" + response)

            except Exception as e:
                print(f"\n错误: {str(e)}")

    async def cleanup(self):
        """清理资源"""
        await self.exit_stack.aclose()

async def main():
    if len(sys.argv) < 2:
        print("用法: python client.py <服务器脚本路径>")
        sys.exit(1)

    client = MCPClient()
    try:
        await client.connect_to_server(sys.argv[1])
        await client.chat_loop()
    finally:
        await client.cleanup()

if __name__ == "__main__":
    import sys
    asyncio.run(main())
核心概念
MCP 建立在以下基本概念之上:
- 架构:了解 MCP 如何连接客户端、服务器和 LLM
- 资源:将服务器的数据和内容暴露给 LLM
- 工具:让 LLM 通过你的服务器执行操作
- 提示词:创建可重用的提示词模板和工作流
- 采样:让你的服务器从 LLM 请求补全
- 传输:了解 MCP 的通信机制
设计原则
MCP 的设计遵循以下核心原则:
-
用户控制
用户应该能够控制: -
哪些上下文被发送到 LLM
- 何时执行操作
- 如何使用工具和资源
-
隐私和安全设置
-
灵活性
协议应该: -
支持多种集成模式
- 适应不同的使用场景
- 允许自定义实现
-
支持未来的扩展
-
安全性
安全性考虑包括: -
验证所有输入
- 保护敏感数据
- 实现访问控制
- 审计关键操作
-
防止滥用
-
可扩展性
协议设计为可扩展的: -
支持新的功能
- 允许版本控制
- 维护向后兼容性
- 适应未来需求
采样
采样是 MCP 的一个强大功能,允许服务器通过客户端请求 LLM 补全,从而实现复杂的代理行为,同时保持安全性和隐私性。
MCP 的这个功能目前在 Claude Desktop 客户端中尚不支持。
采样工作原理
采样流程遵循以下步骤:
- 服务器向客户端发送 sampling/createMessage 请求
- 客户端审查请求并可以修改它
- 客户端从 LLM 采样
- 客户端审查补全结果
- 客户端将结果返回给服务器
- 这种人在环路(human-in-the-loop)的设计确保用户能够控制 LLM 看到和生成的内容。
消息格式
采样请求使用标准化的消息格式:
{
  messages: [
    {
      role: "user" | "assistant",
      content: {
        type: "text" | "image",

        // 文本类型:
        text?: string,

        // 图片类型:
        data?: string,             // base64 编码
        mimeType?: string
      }
    }
  ],
  modelPreferences?: {
    hints?: [{
      name?: string                // 建议的模型名称/系列
    }],
    costPriority?: number,         // 0-1,最小化成本的重要性
    speedPriority?: number,        // 0-1,低延迟的重要性
    intelligencePriority?: number  // 0-1,能力的重要性
  },
  systemPrompt?: string,
  includeContext?: "none" | "thisServer" | "allServers",
  temperature?: number,
  maxTokens: number,
  stopSequences?: string[],
  metadata?: Record<string, unknown>
}
messages 数组包含要发送给 LLM 的对话历史。每条消息有:
- role:可以是 “user” 或 “assistant”
- content:消息内容,可以是:
- 文本类型:
- text:包含文本内容的字符串
- 图片类型:
- data:base64 编码的图片数据
- mimeType:图片的 MIME 类型(例如 "image/jpeg")
modelPreferences 对象允许服务器指定其模型选择偏好:
- hints:客户端可以用来选择合适模型的模型名称建议数组:
- name:可以匹配完整或部分模型名称的字符串(如 “claude-3”、“sonnet”)
- 客户端可以将提示映射到不同提供商的等效模型
- 多个提示按优先顺序评估
- 优先级值(0-1 归一化):
- costPriority:最小化成本的重要性
- speedPriority:低延迟响应的重要性
- intelligencePriority:高级模型能力的重要性
客户端根据这些偏好和其可用模型做出最终的模型选择。
可选的 systemPrompt 字段允许服务器请求特定的系统提示词。客户端可以修改或忽略这个提示词。
上下文包含 includeContext 参数指定要包含哪些 MCP 上下文:
- "none":不包含额外上下文
- "thisServer":包含来自请求服务器的上下文
- "allServers":包含来自所有已连接 MCP 服务器的上下文
客户端控制实际包含的上下文。
采样参数
通过以下参数微调 LLM 采样:
- temperature:控制随机性(0.0 到 1.0)
- maxTokens:生成的最大令牌数
- stopSequences:停止生成的序列数组
- metadata:额外的提供商特定参数
这是向客户端请求采样的示例:
{
  "method": "sampling/createMessage",
  "params": {
    "messages": [
      {
        "role": "user",
        "content": {
          "type": "text",
          "text": "当前目录中有哪些文件?"
        }
      }
    ],
    "systemPrompt": "你是一个有帮助的文件系统助手。",
    "includeContext": "thisServer",
    "maxTokens": 100
  }
}
人在环路控制
采样设计时考虑了人工监督:
对于提示词
* 客户端应向用户展示建议的提示词
* 用户应能修改或拒绝提示词
* 系统提示词可以被过滤或修改
* 上下文包含由客户端控制
对于补全
* 客户端应向用户展示补全结果
* 用户应能修改或拒绝补全结果
* 客户端可以过滤或修改补全结果
* 用户控制使用哪个模型
安全考虑
在实现采样时:
- 验证所有消息内容
- 净化敏感信息
- 实现适当的速率限制
- 监控采样使用情况
- 加密传输中的数据
- 处理用户数据隐私
- 审计采样请求
- 控制成本暴露
- 实现超时
- 优雅地处理模型错误
常见模式
代理工作流
采样支持的代理模式包括:
读取和分析资源
基于上下文做出决策
生成结构化数据
处理多步骤任务
提供交互式帮助
上下文管理
上下文的最佳实践:
请求最少必要的上下文
清晰地组织上下文
处理上下文大小限制
根据需要更新上下文
清理过时的上下文
错误处理
健壮的错误处理应该:
捕获采样失败
处理超时错误
管理速率限制
验证响应
提供回退行为
适当记录错误
限制
需要注意这些限制:
采样依赖于客户端功能
用户控制采样行为
上下文大小有限制
可能应用速率限制
需要考虑成本
模型可用性不同
响应时间不同
不是所有内容类型都支持
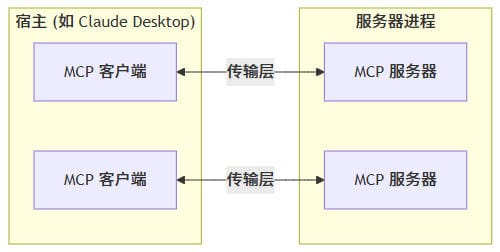
传输
模型上下文协议(MCP)中的传输为客户端和服务器之间的通信提供基础。传输层负责处理消息如何发送和接收的底层机制。
MCP 使用 JSON-RPC 2.0 作为其传输格式。传输层负责将 MCP 协议消息转换为 JSON-RPC 格式进行传输,并将接收到的 JSON-RPC 消息转换回 MCP 协议消息。
有三种类型的 JSON-RPC 消息:
// 请求
{
  jsonrpc: "2.0",
  id: number | string,
  method: string,
  params?: object
}

// 响应
{
  jsonrpc: "2.0",
  id: number | string,
  result?: object,
  error?: {
    code: number,
    message: string,
    data?: unknown
  }
}

// 通知
{
  jsonrpc: "2.0",
  method: string,
  params?: object
}
内置传输类型
MCP 包含两种标准传输实现:
- 标准输入/输出 (stdio)
- 服务器发送事件 (SSE)
stdio 传输通过标准输入和输出流实现通信。这对于本地集成和命令行工具特别有用。
使用 stdio 的场景:
- 构建命令行工具
- 实现本地集成
- 需要简单的进程间通信
- 使用 shell 脚本
    '''
    标准输入输出服务器
    '''
    async def stdio_server():
        try:
            # 创建用于双向通信的流
            read_stream_writer, read_stream = anyio.create_memory_object_stream(0)
            write_stream, write_stream_reader = anyio.create_memory_object_stream(0)

            async def message_handler():
                try:
                    async with read_stream_writer:
                        # 消息处理逻辑
                        pass
                except Exception as exc:
                    logger.error(f"消息处理失败:{exc}")
                    raise exc

            async with anyio.create_task_group() as tg:
                tg.start_soon(message_handler)
                try:
                    # 返回用于通信的流
                    yield read_stream, write_stream
                except Exception as exc:
                    logger.error(f"传输错误:{exc}")
                    raise exc
                finally:
                    tg.cancel_scope.cancel()
                    await write_stream.aclose()
                    await read_stream.aclose()
        except Exception as exc:
            logger.error(f"初始化传输失败:{exc}")
            raise exc
SSE传输支持服务器到客户端的流式传输,同时使用HTTP POST请求实现客户端到服务器的通信。
适用场景:
- 仅需要服务器到客户端的流式传输
- 在受限网络环境下工作
- 实现简单的更新操作
'''
SSE服务器
'''
from mcp.server.sse import SseServerTransport
from starlette.applications import Starlette
from starlette.routing import Route

app = Server("example-server")
sse = SseServerTransport("/messages")

async def handle_sse(scope, receive, send):
    async with sse.connect_sse(scope, receive, send) as streams:
        await app.run(streams[0], streams[1], app.create_initialization_options())

async def handle_messages(scope, receive, send):
    await sse.handle_post_message(scope, receive, send)

starlette_app = Starlette(
    routes=[
        Route("/sse", endpoint=handle_sse),
        Route("/messages", endpoint=handle_messages, methods=["POST"]),
    ]
)

'''
sse客户端
'''
async with sse_client("http://localhost:8000/sse") as streams:
    async with ClientSession(streams[0], streams[1]) as session:
        await session.initialize()
MCP让实现自定义传输变得简单。任何传输实现只需要符合Transport接口即可:
可以实现自定义传输用于:
自定义网络协议
专用通信通道
与现有系统集成
性能优化
错误处理
传输实现应该处理各种错误场景:
- 连接错误
- 消息解析错误
- 协议错误
- 网络超时
- 资源清理
    @contextmanager
    async def example_transport(scope: Scope, receive: Receive, send: Send):
        try:
            # Create streams for bidirectional communication
            read_stream_writer, read_stream = anyio.create_memory_object_stream(0)
            write_stream, write_stream_reader = anyio.create_memory_object_stream(0)

            async def message_handler():
                try:
                    async with read_stream_writer:
                        # Message handling logic
                        pass
                except Exception as exc:
                    logger.error(f"Failed to handle message: {exc}")
                    raise exc

            async with anyio.create_task_group() as tg:
                tg.start_soon(message_handler)
                try:
                    # Yield streams for communication
                    yield read_stream, write_stream
                except Exception as exc:
                    logger.error(f"Transport error: {exc}")
                    raise exc
                finally:
                    tg.cancel_scope.cancel()
                    await write_stream.aclose()
                    await read_stream.aclose()
        except Exception as exc:
            logger.error(f"Failed to initialize transport: {exc}")
            raise exc
工具
工具是模型上下文协议(MCP)中的一个强大原语,使服务器能够向客户端暴露可执行的功能。通过工具,LLM 可以与外部系统交互、执行计算并在现实世界中采取行动。
工具设计为模型控制,这意味着工具从服务器暴露给客户端时,目的是让 AI 模型能够自动调用它们(在人工审批的情况下)。
MCP 中的工具允许服务器暴露可执行的函数,这些函数可以被客户端调用并被 LLM 用来执行操作。工具的关键方面包括:
- 发现:客户端可以通过 tools/list 端点列出可用工具
- 调用:工具通过 tools/call 端点调用,服务器执行请求的操作并返回结果
- 灵活性:工具可以从简单的计算到复杂的 API 交互
像资源一样,工具由唯一的名称标识,并可以包含描述来指导其使用。但是,与资源不同,工具代表可以修改状态或与外部系统交互的动态操作。
每个工具的定义结构如下:
{
  name: string;          // 工具的唯一标识符
  description?: string;  // 人类可读的描述
  inputSchema: {         // 工具参数的 JSON Schema
    type: "object",
    properties: { ... }  // 工具特定的参数
  }
}
这是在 MCP 服务器中实现基本工具的示例:
const server = new Server({
  name: "example-server",
  version: "1.0.0"
}, {
  capabilities: {
    tools: {}
  }
});

// 定义可用工具
server.setRequestHandler(ListToolsRequestSchema, async () => {
  return {
    tools: [{
      name: "calculate_sum",
      description: "将两个数字相加",
      inputSchema: {
        type: "object",
        properties: {
          a: { type: "number" },
          b: { type: "number" }
        },
        required: ["a", "b"]
      }
    }]
  };
});

// 处理工具执行
server.setRequestHandler(CallToolRequestSchema, async (request) => {
  if (request.params.name === "calculate_sum") {
    const { a, b } = request.params.arguments;
    return {
      toolResult: a + b
    };
  }
  throw new Error("未找到工具");
});
app = Server("example-server")

@app.list_tools()
async def list_tools() -> list[types.Tool]:
    return [
        types.Tool(
            name="calculate_sum",
            description="将两个数字相加",
            inputSchema={
                "type": "object",
                "properties": {
                    "a": {"type": "number"},
                    "b": {"type": "number"}
                },
                "required": ["a", "b"]
            }
        )
    ]

@app.call_tool()
async def call_tool(
    name: str,
    arguments: dict
) -> list[types.TextContent | types.ImageContent | types.EmbeddedResource]:
    if name == "calculate_sum":
        a = arguments["a"]
        b = arguments["b"]
        result = a + b
        return [types.TextContent(type="text", text=str(result))]
    raise ValueError(f"未找到工具: {name}")
核心架构
模型上下文协议(MCP)建立在灵活、可扩展的架构之上,可以实现 LLM 应用程序和集成之间的无缝通信。本文档介绍核心架构组件和概念。
MCP 遵循客户端-服务器架构,其中:
- 宿主 是启动连接的 LLM 应用程序(如 Claude Desktop 或 IDE)
- 客户端 在宿主应用程序内部与服务器保持 1:1 连接
- 服务器 为客户端提供上下文、工具和提示
核心组件
协议层
协议层处理消息帧、请求/响应链接和高级通信模式。
    class Session(BaseSession[RequestT, NotificationT, ResultT]):
        async def send_request(
            self,
            request: RequestT,
            result_type: type[Result]
        ) -> Result:
            """
            Send request and wait for response. Raises McpError if response contains error.
            """
            # Request handling implementation

        async def send_notification(
            self,
            notification: NotificationT
        ) -> None:
            """Send one-way notification that doesn't expect response."""
            # Notification handling implementation

        async def _received_request(
            self,
            responder: RequestResponder[ReceiveRequestT, ResultT]
        ) -> None:
            """Handle incoming request from other side."""
            # Request handling implementation

        async def _received_notification(
            self,
            notification: ReceiveNotificationT
        ) -> None:
            """Handle incoming notification from other side."""
            # Notification handling implementation
主要类包括:
- Protocol
- Client
- Server
传输层
传输层处理客户端和服务器之间的实际通信。MCP 支持多种传输机制:
- 标准输入输出传输
- 使用标准输入/输出进行通信
- 适用于本地进程
- 带 SSE 的 HTTP 传输
- 使用服务器发送事件(SSE)进行服务器到客户端的消息传输
- 使用 HTTP POST 进行客户端到服务器的消息传输
所有传输都使用 JSON-RPC 2.0 来交换消息。有关模型上下文协议消息格式的详细信息,请参阅规范。
提示词
提示词使服务器能够定义可重用的提示词模板和工作流,客户端可以轻松地将其呈现给用户和 LLM。它们提供了一种强大的方式来标准化和共享常见的 LLM 交互。
提示词设计为用户控制,这意味着它们从服务器暴露给客户端时,用户可以明确地选择使用它们。
MCP 中的提示词是预定义的模板,可以:
- 接受动态参数
- 包含来自资源的上下文
- 链接多个交互
- 引导特定工作流
- 作为 UI 元素呈现(如斜杠命令)
每个提示词的定义结构如下:
{
  name: string;              // 提示词的唯一标识符
  description?: string;      // 人类可读的描述
  arguments?: [              // 可选的参数列表
    {
      name: string;          // 参数标识符
      description?: string;  // 参数描述
      required?: boolean;    // 参数是否必需
    }
  ]
}
客户端可以通过 prompts/list 端点发现可用的提示词:
// 请求
{
  method: "prompts/list"
}

// 响应
{
  prompts: [
    {
      name: "analyze-code",
      description: "分析代码以寻找潜在的改进",
      arguments: [
        {
          name: "language",
          description: "编程语言",
          required: true
        }
      ]
    }
  ]
}
要使用提示词,客户端需要发送 prompts/get 请求:
// 请求
{
  method: "prompts/get",
  params: {
    name: "analyze-code",
    arguments: {
      language: "python"
    }
  }
}

// 响应
{
  description: "分析 Python 代码以寻找潜在的改进",
  messages: [
    {
      role: "user",
      content: {
        type: "text",
        text: "请分析以下 Python 代码以寻找潜在的改进:\n\n```python\ndef calculate_sum(numbers):\n    total = 0\n    for num in numbers:\n        total = total + num\n    return total\n\nresult = calculate_sum([1, 2, 3, 4, 5])\nprint(result)\n```"
      }
    }
  ]
}
提示词可以是动态的,包括:
嵌入的资源上下文
{
  "name": "analyze-project",
  "description": "分析项目日志和代码",
  "arguments": [
    {
      "name": "timeframe",
      "description": "分析日志的时间段",
      "required": true
    },
    {
      "name": "fileUri",
      "description": "要审查的代码文件的 URI",
      "required": true
    }
  ]
}
处理 prompts/get 请求时:
{
  "messages": [
    {
      "role": "user",
      "content": {
        "type": "text",
        "text": "分析这些系统日志和代码文件是否存在问题:"
      }
    },
    {
      "role": "user",
      "content": {
        "type": "resource",
        "resource": {
          "uri": "logs://recent?timeframe=1h",
          "text": "[2024-03-14 15:32:11] 错误: network.py:127 中的连接超时\n[2024-03-14 15:32:15] 警告: 重试连接(尝试 2/3)\n[2024-03-14 15:32:20] 错误: 超过最大重试次数",
          "mimeType": "text/plain"
        }
      }
    },
    {
      "role": "user",
      "content": {
        "type": "resource",
        "resource": {
          "uri": "file:///path/to/code.py",
          "text": "def connect_to_service(timeout=30):\n    retries = 3\n    for attempt in range(retries):\n        try:\n            return establish_connection(timeout)\n        except TimeoutError:\n            if attempt == retries - 1:\n                raise\n            time.sleep(5)\n\ndef establish_connection(timeout):\n    # 连接实现\n    pass",
          "mimeType": "text/x-python"
        }
      }
    }
  ]
}
多步工作流
const debugWorkflow = {
  name: "debug-error",
  async getMessages(error: string) {
    return [
      {
        role: "user",
        content: {
          type: "text",
          text: `我遇到了这个错误: ${error}`
        }
      },
      {
        role: "assistant",
        content: {
          type: "text",
          text: "我来帮你分析这个错误。你目前尝试过什么方法?"
        }
      },
      {
        role: "user",
        content: {
          type: "text",
          text: "我尝试过重启服务,但错误仍然存在。"
        }
      }
    ];
  }
};